Author Topic: Nintendo + lots of wires = fun?  (Read 35348 times)

FyberOptic

  • King of Earth
  • Administrator
  • Hero Member
  • *****
  • Posts: 2522
  • Oh god what is that?
    • Fybertech.com
Nintendo + lots of wires = fun?
« on: August 20, 2006, 02:26:44 am »
Crosspost from LJ (8-18-06):
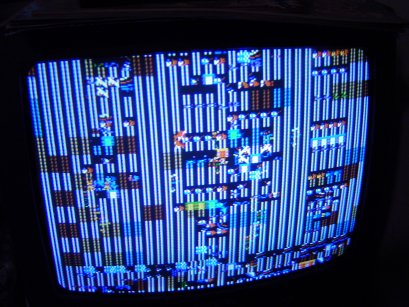


Galaga never looked so good! 

Well, to me, at least.  Anyone else would surely disagree.  But the reason I'm fond of this particular screwed up photo is because it was the result of this.
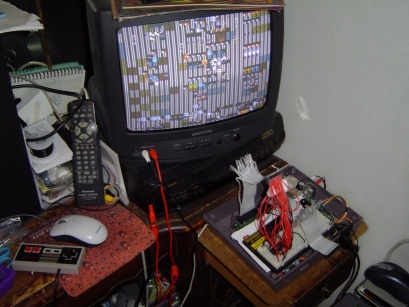


After much wiring, I hooked up a flash eeprom (aka rewritable rom) with a specially patched (by me) version of Galaga to the beat up NES I acquired, and despite the appearance, it's entirely playable.  In fact, considering I've played it so many times in the past, I was able to play the first few rounds and past the first bonus round without losing a life, all the while not even being able to see most of the enemies until they moved.  xD

So you might be wondering how this is at all a success, considering how messed up it is.  Well, that's because I totally knew it'd be this way beforehand.  I just wanted to make sure I could get an eeprom to boot up the NES at all via wires.  I didn't want to have to wire it, considering it involves so many, but the only alternative involved soldering, and I don't have an easy place to do that at, especially where I can vent the fumes.  Plus, it means gutting an NES cartridge for the board, and I don't have any extras at the moment aside from a dead Dragon Warrior, and it's not suited to running Galaga.  The only cartridge I have at the moment actually is SMB/Duck Hunt/Track Meet, which also isn't suited.

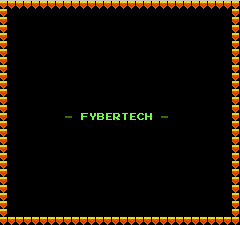
As for why the graphics are screwy, it's because there's no CHR rom installed, and what you do see is coming from graphics copied into the limited onboard NES graphics memory.  Normally an NES cartridge has both a PRG (program) and CHR (characters aka tiles) rom, the former hooked to the cpu, and the latter hooked to the PPU (picture processing unit).  Well, since I only have one eeprom at the moment, needing two different rom chips was obviously a problem.  So my idea was to combine the roms into one, and just copy the other out into video memory on startup.  I even added a little Fybertech intro screen, to indicate when the transfer is done, even though it happens almost instantaneously, and I could jump straight into the game and the player wouldn't know the difference between the original and my own, but what fun is it if I can't make it a little more personalized~!


Of course, this means the PPU needs an available 8kb of video ram to copy the CHR rom into.  Emulators don't care, because there's no real hardware involved, and as far as it's concerned, there actually is 8kb of ram there in place of 8kb of CHR rom, so my patched ROM worked fine in that.  Well, the actual NES only has 2kb of video memory, which it normally uses for screen layout data.  You need at least 1kb for a single screen layout on a simple game, which leaves you with just 1kb of onboard memory to store tiles in (which is normally never done).  So perhaps you're starting to see that 8kb of CHR rom doesn't fit into 1kb of ram, and hence the simplest explanation for why the screen was all screwy.  The tiles it needed to display simply didn't exist, and in the places it expected to find'em, it was finding mirrors of other tiles (because the 2kb repeats if it tries to access anything higher than that).  It was also finding screen layout data thinking it was tiles (again, because of the mirroring effect), which doesn't translate into any sort of imagery, and further explains the screen's screwiness.

Keep in mind that it's merely Galaga that's displaying incorrectly.  There's no actual hardware problem involved (unless you count the lack of video memory).  I can (and plan to) create a simple rom requiring far fewer tiles (64 max) which will only take up 1kb of video memory, leaving the other 1kb for screen layout data.  Such a rom should work perfectly, because it's not trying to use more than is available.  I'll take a picture when I do.

Anyhoo, as for the rom patch itself, I'll explain a little first.  PRG roms can be 32kb max, unless you use a memory mapper (which a majority of NES games did), and the CHR can only be 8kb, unless, again, you use a mapper.  The purpose of a mapper is to switch out pieces of code/graphics you don't need at the moment with pieces you do.  But anyway, in order to stick both the CHR rom and my own code into just 32kb of space, this means I needed an NES rom which had 16kb or less PRG rom.  There aren't many that are so small.  The Japanese version of Galaga, one of my favorite games, just so happened to have 16kb of PRG rom, so I naturally used it for my experiment.  The arrangement of PRG looks like this now:

[8kb Galaga CHR tiles][8kb Fyber code][16kb Galaga PRG code]

This takes up the full 32k allowable PRG rom space.  At the tail end of the Galaga code are a standard set of pointers to where to jump in the code when the NES is turned on.  I simply replaced that pointer to jump into my section of code, which copies the CHR into video memory, then jumps back to where Galaga would have initially jumped had I not interceded.  The game doesn't know the difference.  Also, even though I have 8kb of possible code space to work in, I probably only used a few hundred bytes for my copy procedure and logo (especially since I used Galaga graphics to display it).

So now the next thing to do is to add 8kb more video memory to the NES in place of an 8kb CHR rom.  Some NES cartridges actually did this very thing, including ram in the cartridge instead of a second rom, and copied tiles out of a large PRG rom into video memory as they were needed.  I guess this saved'em some money instead of burning two roms.  But once the NES has an extra 8kb to store all these tiles in, Galaga will run fine.  It's just hooking up another 20+ wires that's daunting.  X_x

Oh, I should mention, the NES wouldn't even be working to do this if I hadn't killed the lockout chip.  You know how an NES blinks every second if you don't put in a cartridge, or if the cart/connector is dirty?  That's what's doing it.  It's a stupid security feature they put in to keep out unlicensed games (which the Japanese version and top-loading American version didn't have).  Disabling the chip is a simple modification, and I'd take a picture if it didn't mean pulling loose my wires to turn the NES board over to show you, so you'll have to take my word for it for now.

Anyhoo, this is probably rather long and drawn out, and surely confusing to many, but for anyone that found it interesting and is curious about anything regarding my mod here or the NES in general, feel free to ask.  I've studied up enough on its workings to know pretty much everything about it . . !

If you want to check out my patched Galaga, you can grab it here.  The logo aint much to see, so you can just hit any button to continue past it into the game.  See if you can get to level 30 . . !  I may use a combination of that logo screen and my running Mario test rom for the small rom I plan to make to get the real NES displaying graphics using just that 1kb of available space.  And then maybe soon I'll get that extra 8kb of ram wired in, so that Galaga will work correctly.
« Last Edit: August 20, 2006, 02:41:16 am by FyberOptic »

FyberOptic

  • King of Earth
  • Administrator
  • Hero Member
  • *****
  • Posts: 2522
  • Oh god what is that?
    • Fybertech.com
Re: Nintendo + lots of wires = fun?
« Reply #1 on: August 20, 2006, 02:29:41 am »
More crossposting:


Man, I take some pictures to post, only for the Linode to totally die for about two hours.  The last hour involved me actually repairing it.  Long story short, their side fucked up, and my file system got corrupted as a result.  Luckily, after a painful process (and a fortunate backup of a couple important system files I have on another machine), I was able to get it restored to normal order, I hope.  Scary thought, that I could have had to install it all over!

Anydangway, now for the good stuff.


:D

Took a little bit of tinkering to get it working properly, since I had to figure out exactly which chip enables and address lines I wanted to trigger the chip, so that I could still use the onboard ram for screen layout.  The first few attempts resulted in sprites looking fine, but the background being totally screwed.  Here's what it looks like now that both are wired up.


There's a small problem with sprites getting ever so slightly corrupted in some animation frames if you play for a little while, which I haven't tracked down the cause of.  If you tap reset, it also corrupts the graphics; you have to hold it in for a couple seconds or so to make them look okay again.  For the time being, I'll chalk that up to possibly being caused by the length of the wire involved, possibly getting interference or something.

The ram chip I used was a 32kb sram cache chip from an old 486 motherboard, which I figure is as good as anything else.  It's wired up to only use 8kb though, to store the graphics tiles.  That leaves the onboard 2kb of ram for screen layout data.

And for anyone wondering about that lockout chip photo, I got one of that, too~!


The red circle, which looks much less red since jpg sucks, shows the pin in question.  Instead of breaking it like so many people do, I carefully pried it out with a small screwdriver, and the pin actually slipped out of the chip entirely.  No more blinking and lockouts.  But then I wondered if I might could just slip it back inside and make it work again, in the event i might want it to test something, and sure enough, it's still okay.  So I left it slightly inside the chip but just enough to not make contact. 

The technical explanation for why this works, btw, is basically pin 4 controls whether the lockout chip functions in lock or key mode.  The NES one is the lock, and the cartridge contains the same chip in key mode.  Once they establish communication, the NES is happy does its thing.  If the one in the NES can't communicate with a key, it resets the NES every second.  The trick is making the one in the NES run in key mode also, so you suddenly have two keys, which just doesn't do anything.

Anyhow, while it's nice to play Galaga on a real NES on a television, I think I'm spoiled from having done so in emulators so much, because it's so crisp on the computer screen, and so blurry on the tv.  But, I'm proud of getting it to work nonetheless . . !

FyberOptic

  • King of Earth
  • Administrator
  • Hero Member
  • *****
  • Posts: 2522
  • Oh god what is that?
    • Fybertech.com
Re: Nintendo + lots of wires = fun?
« Reply #2 on: August 20, 2006, 02:47:08 am »
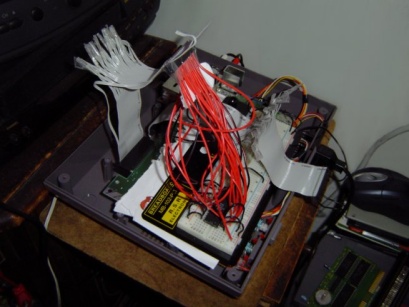
Oh, what I never did mention in those LJ posts was that the connector coming from the NES board (with all the wires coming from it) is actually two old floppy drive connectors, which I dremeled the ends off of.  They come in pretty useful for anything card-edge related, since it's so hard to come across something of the right size, whether it be ISA cards in a PC or what have you.

The board the chips are mounted in is just your standard breadboard, but since it has a metal plate backing, I have the warranty renewal from Circuit City for my computer laying underneath it (the white thing) to keep from shorting out the NES board, since I never plan to give Circuit City the $150 to renew that stupid waste of money.

Altzan

  • Website Designer
  • Sr. Member
  • ****
  • Posts: 357
    • My website of boringness
Re: Nintendo + lots of wires = fun?
« Reply #3 on: August 20, 2006, 08:40:31 am »
How come the coolest things make the biggest messes?

But seriously, good job there, that's neat stuff.
TORTQUATO TASSO is the best name ever.


RANDOM WEBSITE
SEE MY POKEMANS CARD

FyberOptic

  • King of Earth
  • Administrator
  • Hero Member
  • *****
  • Posts: 2522
  • Oh god what is that?
    • Fybertech.com
Re: Nintendo + lots of wires = fun?
« Reply #4 on: August 21, 2006, 10:24:31 pm »
Yet more crosspost!


I updated my board to support the UNROM mapper, since it only uses a couple of standard ICs which I happened to have; a 74LS161, which is basically a binary counter (similar to what I used for that binary LED thing I showed a while back), and a 74LS32, which is a logic "OR" gate.  I actually had to pull the OR out of an old dead PC XT I have here, which has all the chips socketed, making it a treasure trove of components that I can easily remove.  Strangely, you'd think a computer would have several of something as common as an OR gate, but out of all 88 chips, there was only one.  Lucky for me!

When I first tried it out after wiring it up, I had the Japanese version of Bomberman 2 on the eeprom, but all I was getting was a black screen.  A bit disappointed that something was possibly hooked up wrong, I poked around for a bit, but then decided to try another rom, just in case.  Apparently, that was all that was the matter, because Contra worked perfectly.  In fact, I played all the way through it already.  :D  Strictly for testing purposes, of course.


The counter chip isn't even used as a counter in this particular setup.  Since that particular chip can have a value set directly into it (to set it up before you start counting and such), that's all it's used for here.  That pretty much makes it a 4-bit data latch, with a latch being something that grabs the current state of address or data lines and saves them.  The outputs of this makeshift latch run to the upper address lines of the eeprom, which select which section to use at any particular time, allowing the NES to access more data than it normally can (aka, a memory mapper). 

As for the OR gate, it's combined with the outputs of the counter to force a certain section of eeprom into a certain area of the NES address space at all times, generally for the game engine itself, and for the standard pointers to where to jump in the code upon a reset.  It's a pretty simple yet clever setup, really, but I won't get any further into the technical details of that.

The nice thing about UNROM games is that they were one of the kinds of games I mentioned before that actually use SRAM in place of CHR rom, and copy their tiles out to graphics memory, in much the same way my patched Galaga was working.  This means my setup was already perfect for converting into UNROM, which allows it to play UNROM games natively without the need for patching.  And there's several good UNROM games to play.

Unfortunately, I forgot to leave some space free on the board when I wired this up, because my other plan was to place an inverter on there as well, to assist in a setup I had in mind which would allow me to run 10 of my patched roms from the one eeprom with a selectable menu on power-up.  Ah well.  I might try shuffling things a bit sometime.


In similar news, earlier today I decided to try desoldering chips off my dead Dragon Warrior to see how easy it might be to use a real board for my work.  I started with desoldering wick (which sucks molten solder into its strands), but it was taking a really long time and not even doing a good job.  I remembered I had a solder sucker in here that I ordered once before, and despite being afraid it might suck leads clean off the board (since it's basically a handheld push-button-activated plunger), I gave it a shot anyway.  To my surprise, it sucked all the solder out of several of the holes I tried, usually on the first go.  But on the ones I had already used the wick on, there wasn't enough solder left for the sucker to work, so I'll probably have to actually re-solder those pins before I can try removing again. 

I also accidently touched the plastic casing of the soldering wick to the iron, which stank somethin' fierce . . !

I'd try to use the Dragon Warrior cart as an MMC1 mapper board, but since it doesn't work at all, it's hard telling what's actually wrong with it; the mapper chip itself could be dead.  So I figure if anything, I'll just connect what the mapper used to take care of directly to the chips, and use it for an NROM board or something (a cart with no mapper, like most earlier games). 

Andddd that's it for now!